SpringBoot项目引入MCP的实现示例
在 spring boot 项目开发过程中,引入 mcp(具体功能根据实际情况而定)能够为项目增添强大的功能支持。本文将详细介绍如何在 spring boot 项目中引入 mcp,包括在 pom 文件中引入依赖、配置 application.properties 文件、通过配置类初始化 mcp tools 实例、编写业务处理类、生成 mcp 对外接口类以及通过测试类进行自测等步骤。
一、pom 引入依赖
在 spring boot 项目的 pom.xml 文件中,我们需要引入 mcp 相关的依赖。以下是引入依赖的具体代码:
    4.0.0

        org.springframework.boot
        spring-boot-starter-parent
        3.2.3


    com.demo
    mcp-demo
    1.0-snapshot
    pom

        17
        32.1.2-jre
        4.4
        1.0.0-snapshot


        mcp-demo-launcher


                org.springframework.ai
                spring-ai-bom
                ${spring-ai.version}
                pom
                import


            spring-milestones
            spring milestones
            https://repo.spring.io/milestone

                false


            spring-snapshots
            spring snapshots
            https://repo.spring.io/snapshot

                false


            org.springframework.boot
            spring-boot-starter


                    spring-boot-starter-logging
                    org.springframework.boot


            org.springframework.boot
            spring-boot-starter-test
            test


            org.springframework.ai
            spring-ai-core
            ${spring-ai.version}


            org.springframework.ai
            spring-ai-starter-mcp-server-webmvc
            ${spring-ai.version}


            org.springframework.boot
            spring-boot-starter-web


                    org.springframework.boot
                    spring-boot-starter-logging


            org.springframework
            spring-context


            org.springframework.boot
            spring-boot-starter-log4j2
在上述代码中,重点关注加粗加绿的部分,这是新增的 mcp 相关依赖。spring-ai-starter-mcp-server-webmvc依赖提供了 mcp 服务器支持(webmvc 版本),同时还引入了spring-ai-core等相关依赖,这些依赖将为项目使用 mcp 功能奠定基础。在实际项目中,你需要根据项目的实际情况对其他部分进行调整,例如项目的 groupid、artifactid、版本号以及其他依赖的版本等。
二、application.properties 文件增加 mcp 配置
在 spring boot 项目的application.properties文件中,我们需要增加 mcp 相关的配置。以下是具体的配置内容:
server.port=8080
spring.application.name=mcp-demo
spring.main.banner-mode=off
# mcp
spring.ai.mcp.server.enabled=true
spring.ai.mcp.server.resource-change-notification=true
spring.ai.mcp.server.prompt-change-notification=true
spring.ai.mcp.server.tool-change-notification=true
spring.ai.mcp.server.name=mcp-demo-service
spring.ai.mcp.server.version=1.0.0
spring.ai.mcp.server.type=sync
spring.ai.mcp.server.sse-message-endpoint=/mcp/messages
同样,加粗加绿的部分是新增的 mcp 配置。这些配置项用于启用 mcp 服务器,设置服务器名称、版本、类型以及相关通知功能等。spring.ai.mcp.server.enabled=true表示启用 mcp 服务器;spring.ai.mcp.server.name设置了服务器的名称;spring.ai.mcp.server.version设置了服务器的版本;spring.ai.mcp.server.type设置了服务器的类型为 sync 等。这些配置将影响 mcp 服务器在项目中的运行方式和功能特性,你可以根据项目需求进行调整。
三、通过配置类实现 mcp tools 实例初始化
接下来,我们需要通过配置类来实现 mcp tools 实例的初始化。以下是具体的代码实现:
@configuration
public class mcpserverconfig {
@autowired
private applicationcontext applicationcontext;
@bean
public toolcallbackprovider autoregistertools() {
// 获取所有带有 @component 注解且类名以 facade 结尾的 bean
string[] beannames = applicationcontext.getbeannamesforannotation(component.class);
list
上述代码实现了根据注解扫描自动构建 toolobjects 的功能。它会获取所有带有@component注解且类名以facade结尾的 bean,然后将这些 bean 作为工具对象进行一次性构建。此规则主要是为了适配mcp-facade-generator(插件详见:https://github.com/james-zou/mcp-facade-generator)插件。如果不使用此插件,该规则可以根据项目需求进行调整。通过这种方式初始化 mcp tools 实例,能够方便地将项目中的业务处理类整合到 mcp 框架中,为后续的业务处理提供支持。
四、编写业务处理类
业务处理类是 java 项目中正常的业务处理接口实现类。在引入 mcp 的项目中,我们需要对业务处理类进行一些特定的标注。以下是一个示例业务处理类:
@mcpservice(packagename = "com.demo.mcp.web.facade")
@service
public class weatherservice {
	/**
* get weather information by city name
* @return
*/
	public string getweather(string cityname) {
		// implementation
		return string.format(
		"{"success":true,"data":{"city":"%s","temperature":"25°c","condition":"sunny"},"message":"success","code":"200"}",
		cityname
		);
	}
}
在这个业务处理类中,标红的@mcpservice注解是mcp-facade-generator插件提供的。这个注解用于将该业务处理类与 mcp 框架进行关联,packagename属性指定了相关的包名。在实际项目中,你可以根据业务需求编写具体的业务逻辑,这里的getweather方法只是一个简单的示例,返回了一个固定格式的天气信息字符串。
五、生成 mcp 对外接口类
通过执行mvn compile命令,就可以生成 mcp 对外接口类。以下是生成的weatherservicefacade类的示例:
public class weatherservicefacade {
	@autowired
	private weatherservice service;
	@tool(description = "get weather information by city name")
	public mcpresponse getweather(mcprequest request) {
		try {
			// 解析请求参数
			java.lang.string cityname = request.getparameter("cityname", java.lang.string.class);
			object result = service.getweather(cityname);
			return mcpresponse.success(result);
		}
		catch (exception e) {
			return mcpresponse.error(e.getmessage());
		}
	}
}
这个类是 mcp 对外暴露的接口类,它通过@autowired注入了weatherservice业务处理类。@tool注解描述了该接口的功能,即获取城市的天气信息。在getweather方法中,它首先解析请求参数,然后调用weatherservice的getweather方法获取结果,并将结果封装成mcpresponse返回。如果在处理过程中发生异常,则返回错误信息。通过生成这样的对外接口类,能够方便地与外部系统进行交互,提供 mcp 相关的服务。
六、通过测试类模拟 mcp 客户端自测
最后,我们可以通过编写测试类来模拟 mcp 客户端进行自测。以下是两个相关的测试类示例:
public class clientsse {
	public static void main(string[] args) {
		var transport = new httpclientsseclienttransport("http://localhost:19401");
		new sampleclient(transport).run();
	}
}
public class sampleclient {
	private final mcpclienttransport transport;
	public sampleclient(mcpclienttransport transport) {
		this.transport = transport;
	}
	public void run() {
		try {
			var client = mcpclient.sync(this.transport).build();
			client.initialize();
			client.ping();
			// list and demonstrate tools
			mcpschema.listtoolsresult toolslist = client.listtools();
			log.info("available tools = " + toolslist);
			// 调用 getweather 接口
			mcpschema.calltoolresult weatherresult = client.calltool(new mcpschema.calltoolrequest(
			"getweather",
			map.of("cityname", "北京")
			));
			// 打印完整的响应对象
			log.info("weather result: {}", weatherresult);
			// 获取响应内容
			for (mcpschema.content content : weatherresult.content()) {
				if (content instanceof mcpschema.textcontent) {
					mcpschema.textcontent textcontent = (mcpschema.textcontent) content;
					log.info("weather info: {}", textcontent.text());
				}
			}
			client.closegracefully();
		}
		catch (exception e) {
			log.error("error calling weather service", e);
		}
	}
}
在clientsse类中,它创建了一个httpclientsseclienttransport对象,并通过sampleclient类来执行测试。sampleclient类中,首先初始化mcpclient,然后通过ping方法测试连接,接着列出可用的工具并调用getweather接口获取天气信息。在调用接口后,它打印完整的响应对象,并提取响应内容中的天气信息进行打印。如果在测试过程中发生异常,则记录错误信息。通过这样的测试类,我们可以验证 mcp 在项目中的功能是否正常,确保引入的 mcp 能够满足项目的需求。
通过以上六个步骤,我们详细介绍了在 spring boot 项目中引入 mcp 的全过程,包括依赖引入、配置、实例初始化、业务处理类编写、接口类生成以及测试等方面。希望这篇文档能够帮助你顺利在 spring boot 项目中引入并使用 mcp。
参考文档
- [spring ai 文档]
- [mcp facade generator]
- [mcp springboot server]
到此这篇关于springboot项目引入mcp的实现示例的文章就介绍到这了,更多相关springboot引入mcp内容请搜索代码网以前的文章或继续浏览下面的相关文章希望大家以后多多支持代码网!
热门文章
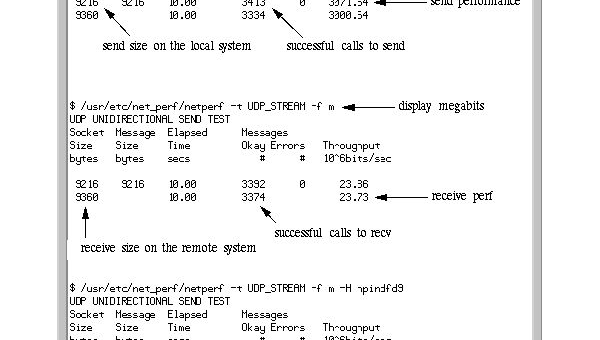
Linux怎样优化网络带宽使用
2025-04-20
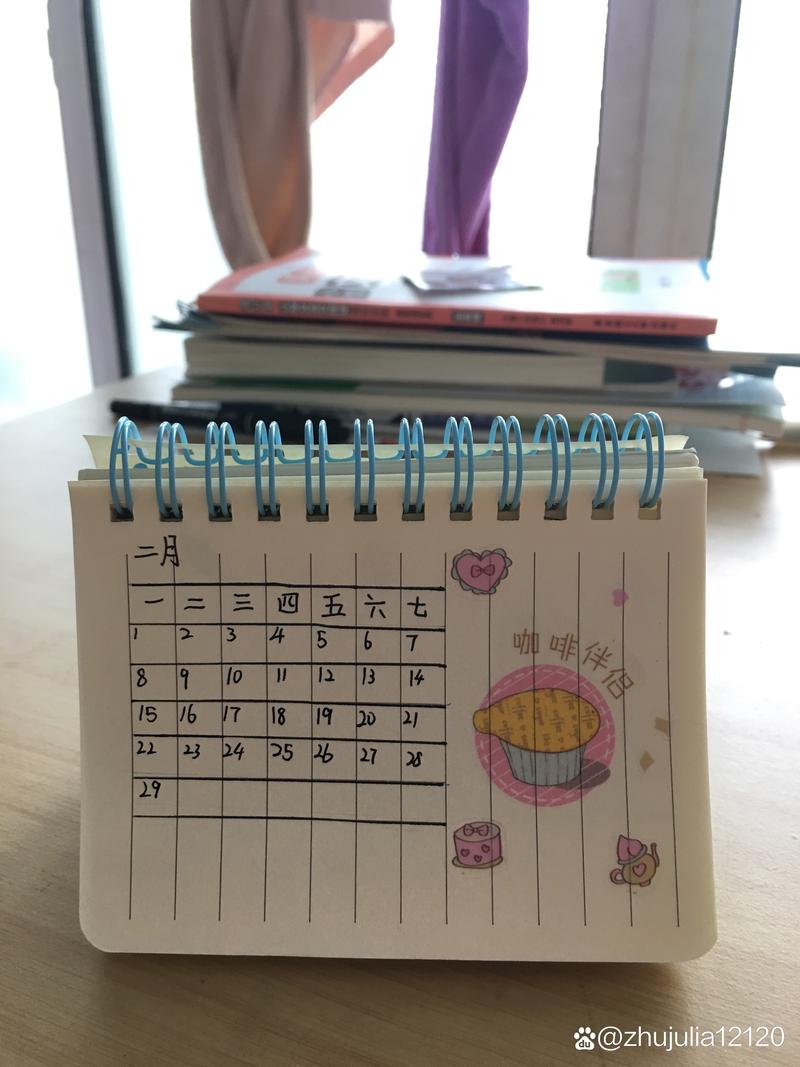
如何手工制作台历?简单步骤与创意设计指南
2025-04-19
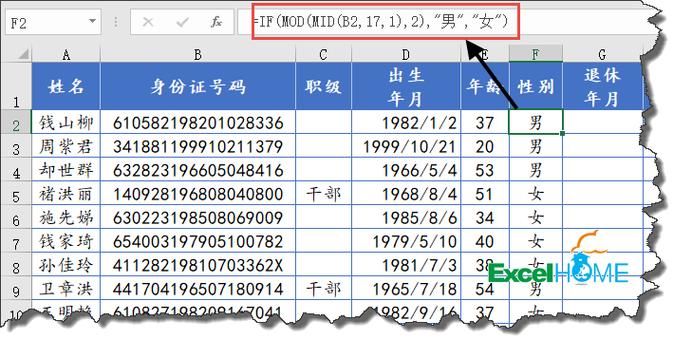
如何查询他人身份证号码?合法途径与注意事项解析
2025-04-19
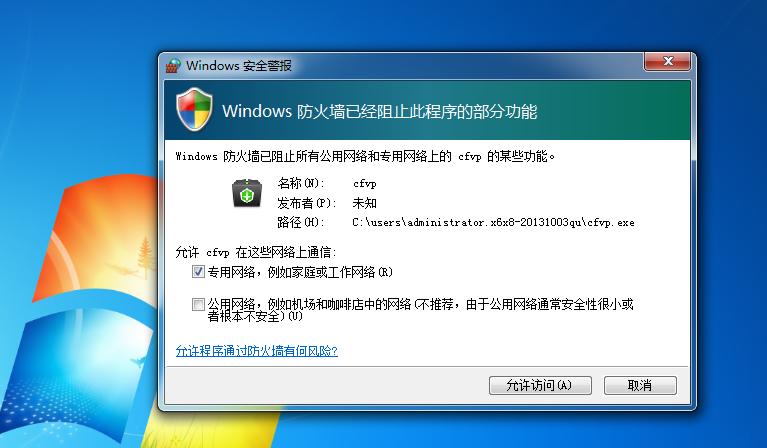
Windows防火墙打不开怎么办?全面解决方法
2025-04-14

Linux设置环境变量的方法?linux设置环境变量的命令
2025-04-11
CentOS与Aliyun Linux有什么区别?如何选择最佳方案?
2025-03-24