「PHP」laravel 项目实现邮箱验证功能
邮箱验证功能在很多网站都有用到,我的个人网站上也用到,邮箱验证需要用到邮件发送服务, Laravel 提供了非常简单的邮件发送 API,Laravel 项目实现邮件发送功能很简单,下面我开始介绍一下我的具体实现。
邮箱验证
邮箱验证功能实现具体步骤如下:
- 添加字段,为用户表添加两个字段,验证令牌 (verification_token) 和验证状态 (verified) 。
- 生成令牌。
- 用户登录后,检测是否验证过邮箱,没有则引导去验证。
- 使用阿里云企业邮箱发送邮箱验证链接。
- 用户点击邮箱验证链接完成验证。
添加字段
使用命令生成迁移文件,命令如下:
$ php artisan make:migration add_verification_to_users_table --table=users
命令会在 database/migrations 目录下生成迁移文件 [timestamp]\_add\_verification\_to\_users\_table.php,修改迁移文件,修改后如下:
use Illuminate\Support\Facades\ Schema ;
use Illuminate\Database\Schema\Blueprint;
use Illuminate\Database\Migrations\Migration;
class AddVerificationToUsersTable extends Migration
{
 /**
 * Run the migrations.
 *
 * @return void
 */
 public  function  up()
 {
 Schema::table('users', function (Blueprint $table) {
 $table->string('verification_token')->nullable();
 $table->boolean('verified')->default(false);
 });
 }
 /**
 * Reverse the migrations.
 *
 * @return void
 */
 public function down()
 {
 Schema::table('users', function (Blueprint $table) {
 $table->dropColumn('verification_token');
 $table->dropColumn('verified');
 });
 }
接着我运行迁移,将字段加入到用户表中。运行命令如下:
php artisan migrate
生成令牌
我希望用户注册的时候就给用户生成令牌,所以我在 App 目录下创建 Observers 目录,并在 Observers 目录下创建 UserObserver.php 文件,并编写如下代码:
namespace App\Observers;
use App\Models\Article;
use App\Models\Comment;
use App\Models\Reply;
use App\Models\User;
class UserObserver
{
 public function creating(User $user)
 {
 $user->verification_token=str_random(30);
 }
}
在 app/Providers 目录下的 AppServiceProvider.php 文件中 注册监听 Eloquent 事件,代码如下:
namespace App\Providers;
use Illuminate\Support\ServiceProvider;
class AppServiceProvider extends ServiceProvider
{
 /**
 * Bootstrap any application services.
 *
 * @return void
 */
 public function boot()
 {
 \App\Models\User::observe(\App\Observers\UserObserver::class);
 }
 /**
 * Register any application services.
 *
 * @return void
 */
 public function register()
 {
 //
 }
}
用户登录后,检测是否验证过邮箱,没有则引导去验证
用户登录后,会检测邮箱是否验证,如果没有验证就会出现邮箱未验证的提示,并引导用户去验证。效果图如下:
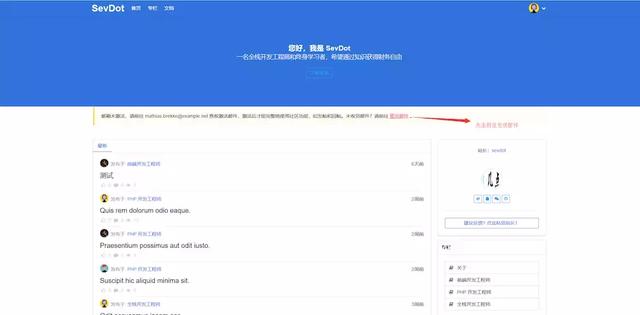
个人网站测试网站截图
实现引导的代码如下:
@if(Auth::check() && !Auth::user()->verified&&!Request::is(' email _verification_required'))
 Route ('email-verification-required') }}">重发邮件 。
设置路由,修改 routes 目录下 web.php 文件,增加一个路由,代码如下:
Route::get('/email_verification_required', 'UsersController@emailVerificationRequired')->name('email-verification-required');
接下来为用户控制器定义一个 emailVerificationRequired 方法,该方法将用于用户点击引导链接进入邮件发送页面,页面效果如下:
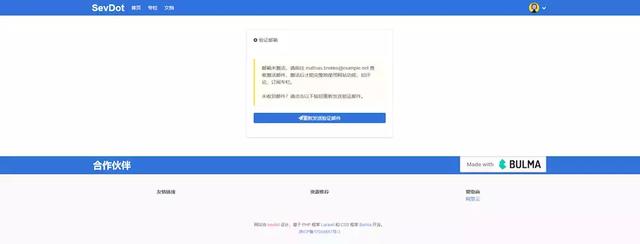
个人网站测试网站截图
emailVerificationRequired 方法具体实现代码如下:
app/Http/Controllers/UsersController.php
 public function emailVerificationRequired(){
 return view('users.edit_email_notify');
 }
实现页面代码如下:
resources/views/users/edit_email_notify.blade.php
@extends('layouts.app')
@section('title', '发送邮箱验证')
@section('content')