Linux中如何配置和使用 Elasticsearch 搜索引擎
近期有些网友想要了解的相关情况,小编通过整理给您分享一下。
为什么选择Elasticsearch?
Elasticsearch作为当前最流行的开源搜索引擎之一,已经成为许多企业处理海量数据的首选工具。它基于Lucene构建,提供分布式、多租户的全文搜索引擎,具有RESTful API接口,能够快速存储、搜索和分析大量数据。
在Linux环境下运行Elasticsearch尤其高效,因为Linux系统对资源的管理更加精细,能够充分发挥Elasticsearch的性能优势。无论是日志分析、电商搜索还是应用内检索,Elasticsearch都能提供近乎实时的搜索体验。
准备工作
在开始安装之前,确保你的Linux系统满足以下基本要求:
- Java环境:Elasticsearch需要Java 8或更高版本运行
- 足够的内存:建议至少4GB RAM
- 足够的磁盘空间:根据数据量预估
- 非root用户:出于安全考虑,不建议使用root运行
可以通过以下命令检查Java版本:
java -version如果尚未安装Java,可以使用系统包管理器安装OpenJDK:
sudo apt-get install openjdk-11-jdk # Ubuntu/Debiansudo yum install java-11-openjdk # CentOS/RHEL安装Elasticsearch
方法一:使用包管理器安装(推荐)
对于Debian/Ubuntu系统:
wget -qO - https://artifacts.elastic.co/GPG-KEY-elasticsearch | sudo apt-key add -sudo apt-get install apt-transport-httpsecho "deb https://artifacts.elastic.co/packages/7.x/apt stable main" | sudo tee /etc/apt/sources.list.d/elastic-7.x.listsudo apt-get update && sudo apt-get install elasticsearch对于RHEL/CentOS系统:
sudo rpm --import https://artifacts.elastic.co/GPG-KEY-elasticsearchsudo tee /etc/yum.repos.d/elasticsearch.repo <方法二:手动下载安装
如果更喜欢手动安装,可以从官网下载.tar.gz包:
wget https://artifacts.elastic.co/downloads/elasticsearch/elasticsearch-7.15.2-linux-x86_64.tar.gztar -xzf elasticsearch-7.15.2-linux-x86_64.tar.gzcd elasticsearch-7.15.2/配置Elasticsearch
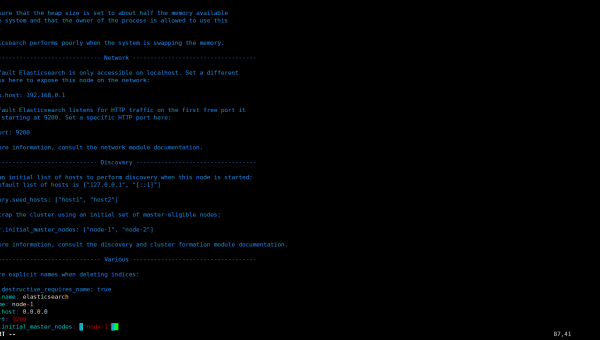
安装完成后,需要根据实际需求调整配置文件。主要配置文件位于:
/etc/elasticsearch/elasticsearch.yml # 主配置文件/etc/elasticsearch/jvm.options # JVM参数配置基本配置修改
编辑主配置文件:
sudo nano /etc/elasticsearch/elasticsearch.yml建议修改以下参数:
cluster.name: my-application # 设置集群名称node.name: node-1 # 节点名称path.data: /var/lib/elasticsearch # 数据存储路径path.logs: /var/log/elasticsearch # 日志存储路径network.host: 0.0.0.0 # 绑定所有网络接口http.port: 9200 # HTTP端口discovery.seed_hosts: ["host1", "host2"] # 集群发现主机列表cluster.initial_master_nodes: ["node-1"] # 初始主节点JVM调优
根据服务器内存情况调整JVM堆大小:
sudo nano /etc/elasticsearch/jvm.options建议设置:
-Xms2g # 初始堆大小-Xmx2g # 最大堆大小注意:不要超过物理内存的50%,同时确保不超过32GB(由于JVM指针压缩限制)。
启动与验证
配置完成后,启动Elasticsearch服务:
sudo systemctl daemon-reloadsudo systemctl enable elasticsearchsudo systemctl start elasticsearch检查服务状态:
sudo systemctl status elasticsearch验证是否正常运行:
curl -X GET "localhost:9200/"正常响应应包含类似信息:
{ "name" : "node-1", "cluster_name" : "my-application", "cluster_uuid" : "xxxxxx", "version" : { "number" : "7.15.2", "build_flavor" : "default", "build_type" : "deb", "build_hash" : "xxxxxx", "build_date" : "2021-11-24T00:42:39.145Z", "build_snapshot" : false, "lucene_version" : "8.9.0", "minimum_wire_compatibility_version" : "6.8.0", "minimum_index_compatibility_version" : "6.0.0-beta1" }, "tagline" : "You Know, for Search"}基本操作指南
创建索引
索引相当于传统数据库中的"数据库"概念。创建索引命令:
curl -X PUT "localhost:9200/my_index?pretty"添加文档
向索引中添加文档(相当于数据库中的记录):
curl -X POST "localhost:9200/my_index/_doc/1?pretty" -H 'Content-Type: application/json' -d'{ "title": "Elasticsearch入门", "content": "这是一篇关于Elasticsearch基础使用的文章", "tags": ["搜索", "数据库"], "created_at": "2023-05-01"}'查询文档
简单查询:
curl -X GET "localhost:9200/my_index/_search?q=title:入门&pretty"复杂查询使用DSL语法:
curl -X GET "localhost:9200/my_index/_search?pretty" -H 'Content-Type: application/json' -d'{ "query": { "match": { "title": "入门" } }}'删除索引
删除不再需要的索引:
curl -X DELETE "localhost:9200/my_index?pretty"性能优化技巧
分片与副本策略
创建索引时指定分片和副本数:
curl -X PUT "localhost:9200/my_optimized_index?pretty" -H 'Content-Type: application/json' -d'{ "settings": { "number_of_shards": 3, "number_of_replicas": 1 }}'- 分片数:建议每个分片大小在20-50GB之间
- 副本数:生产环境至少1个,提高可用性和查询性能
索引模板
使用模板统一管理索引设置:
curl -X PUT "localhost:9200/_index_template/my_template?pretty" -H 'Content-Type: application/json' -d'{ "index_patterns": ["logs-*"], "template": { "settings": { "number_of_shards": 3, "number_of_replicas": 1 }, "mappings": { "properties": { "timestamp": { "type": "date" }, "message": { "type": "text" } } } }}'定期优化
对于频繁更新的索引,定期执行强制合并:
curl -X POST "localhost:9200/my_index/_forcemerge?max_num_segments=1"安全配置
启用基本认证
编辑elasticsearch.yml:
xpack.security.enabled: true重启服务后设置密码:
sudo /usr/share/elasticsearch/bin/elasticsearch-setup-passwords interactive配置HTTPS
生成证书:
sudo /usr/share/elasticsearch/bin/elasticsearch-certutil cert -out /etc/elasticsearch/elastic-certificates.p12 -pass ""配置elasticsearch.yml:
xpack.security.transport.ssl.enabled: truexpack.security.transport.ssl.verification_mode: certificatexpack.security.transport.ssl.keystore.path: elastic-certificates.p12xpack.security.transport.ssl.truststore.path: elastic-certificates.p12常见问题解决
内存不足
如果遇到内存不足错误,可以:
- 增加服务器内存
- 调整JVM堆大小
- 减少分片数量
- 关闭不必要的字段
无法启动
检查日志文件:
tail -f /var/log/elasticsearch/my-application.log常见原因包括:
- 配置错误
- 端口冲突
- 文件权限问题
性能下降
排查步骤:
- 检查节点状态:
GET _nodes/stats - 检查索引状态:
GET _cat/indices?v - 检查线程池:
GET _nodes/thread_pool - 检查磁盘I/O:
GET _nodes/stats/fs
进阶应用
与Logstash集成
配置Logstash将数据导入Elasticsearch:
input { file { path => "/var/log/nginx/access.log" start_position => "beginning" }}filter { grok { match => { "message" => "%{COMBINEDAPACHELOG}" } }}output { elasticsearch { hosts => ["localhost:9200"] index => "nginx-logs-%{+YYYY.MM.dd}" }}与Kibana集成
安装Kibana后,配置kibana.yml连接Elasticsearch:
elasticsearch.hosts: ["http://localhost:9200"]elasticsearch.username: "kibana_system"elasticsearch.password: "your_password"使用中文分词
安装IK分词器:
sudo /usr/share/elasticsearch/bin/elasticsearch-plugin install https://github.com/medcl/elasticsearch-analysis-ik/releases/download/v7.15.2/elasticsearch-analysis-ik-7.15.2.zip创建使用IK分词器的索引:
curl -X PUT "localhost:9200/chinese_index?pretty" -H 'Content-Type: application/json' -d'{ "settings": { "analysis": { "analyzer": { "ik_smart": { "type": "custom", "tokenizer": "ik_smart" } } } }, "mappings": { "properties": { "content": { "type": "text", "analyzer": "ik_smart" } } }}'监控与维护
健康检查
检查集群健康状态:
curl -X GET "localhost:9200/_cluster/health?pretty"状态说明:
- green:所有主分片和副本分片都正常
- yellow:所有主分片正常,但部分副本分片不正常
- red:部分主分片不正常
定期备份
使用快照功能备份数据:
- 创建仓库:
curl -X PUT "localhost:9200/_snapshot/my_backup?pretty" -H 'Content-Type: application/json' -d'{"type": "fs","settings": {"location": "/mnt/backups/elasticsearch"}}' - 创建快照:
curl -X PUT "localhost:9200/_snapshot/my_backup/snapshot_1?wait_for_completion=true&pretty" - 恢复快照:
curl -X POST "localhost:9200/_snapshot/my_backup/snapshot_1/_restore?pretty"
结语
Elasticsearch在Linux系统上的部署和配置虽然有一定复杂度,但通过合理的规划和调优,可以构建出高性能、高可用的搜索服务。本文介绍了从安装配置到基本操作,再到性能优化和安全加固的全过程,希望能帮助你在Linux环境下顺利部署和使用Elasticsearch。
随着数据量的增长和业务需求的变化,你可能需要进一步探索Elasticsearch的高级特性,如聚合分析、机器学习功能等。持续学习和实践是掌握Elasticsearch的关键,建议定期关注官方文档和社区动态,获取最新的最佳实践。