Java如何使用Tessdata做OCR图片文字识别
这篇文章主要介绍“Java如何使用Tessdata做OCR图片文字识别”,在日常操作中,相信很多人在Java如何使用Tessdata做OCR图片文字识别问题上存在疑惑,小编查阅了各式资料,整理出简单好用的操作方法,希望对大家解答”Java如何使用Tessdata做OCR图片文字识别”的疑惑有所帮助!接下来,请跟着小编一起来学习吧!
说到文字识别,目前除了用一些现成的api,大概就是 tessdata、canvas或者 ocrad等。
1、百度接口用过(可以自己去百度开发者申请,免费的),识别率吧,还可以,但也不是百分百的,但是次数使用有限制,虽然也是够用,但是被限制总是害怕超过不让用。2、canvas的话是需要对图片做具体的处理,涉及到图片的翻转、置灰、文字间隔的设定等等,成功率很高,但是公司产品验证码是各式各样的,没办法用这种方法处理,所以暂时放弃了。3、ocrad这个目前用过其.js版本,识别率还是比较低的,具体使用后面会再写一篇文章介绍一下的。虽然,网上对于 Tessdata的技术介绍文章一搜一大片,但是其实小仙真正用起来的时候,还是费了点周折的。:fendou:
思路:截全图–截取元素图片–处理–识别–输出
注意:图片截取格式统一为.jpg,用png会出问题。
1、添加项目依赖
在项目的pom.xml文件中,添加以下依赖
<!--<tess4j图片识别>-->
<dependency>
	<groupId>net.java.dev.jna</groupId>
	<artifactId>jna</artifactId>
	<version>4.1.0</version>
</dependency>
<dependency>
	<groupId>net.sourceforge.tess4j</groupId>
	<artifactId>tess4j</artifactId>
	<version>2.0.1</version>
	<exclusions>
		<exclusion>
			<groupId>com.sun.jna</groupId>
			<artifactId>jna</artifactId>
		</exclusion>
	</exclusions>
</dependency>
2、从全图中截取元素图片
//元素截图

publicstaticString[]elementscreenShot(WebElementelement)
		throwsException{
	WrapsDriverwrapsDriver=(WrapsDriver)element;
	longtime=System.currentTimeMillis();

	//截图整个页面
	Filescreen=((TakesScreenshot)wrapsDriver.getWrappedDriver())
			.getScreenshotAs(OutputType.FILE);
	BufferedImageimg=ImageIO.read(screen);
	//获得元素的高度和宽度
	intwidth=element.getSize().getWidth();
	intheight=element.getSize().getHeight();
	//创建一个矩形使用上面的高度,和宽度
	Rectanglerect=newRectangle(width,height);
	//得到元素的坐标
	Pointp=element.getLocation();
	BufferedImagedest=img.getSubimage(p.getX(),p.getY(),
			(int)rect.getWidth(),(int)rect.getHeight());
	//存为png格式
	ImageIO.write(dest,"png",screen);
	DateFormatdateFormat=newSimpleDateFormat("yyyyMMddhhmmss");
	FileSystemViewfsv=FileSystemView.getFileSystemView();
	Filecom=fsv.getHomeDirectory();//这便是读取桌面路径的方法了
	Stringurl=com.getPath()+"/test";
	Filelocation=newFile(url);
	if(!location.exists()){
		location.mkdirs();
	}

	StringimgPath=location.getAbsolutePath()+File.separator+"pic_"
			+time+".jpg";
	StringcleanPath=location.getAbsolutePath();
	//存了原图片和清楚后图片的地址
	String[]imgpath={imgPath,cleanPath};
	FiletargetFile=newFile(imgPath);
	try{
		FileUtils.copyFile(screen,targetFile);
	}catch(IOExceptione1){
		e1.printStackTrace();
	}
	//元素图片路径
	returnimgpath;
}
3、对截取图片进行处理:灰度化、二值化、去除干扰线等
以下是图像处理的类,其中对于去除干扰线的操作还是慎用,可能会把文字也剔除掉。
publicclassCleanElementImage{
/**
*
*@paramsfile
*需要去噪的图像
*@paramdestDir
*去噪后的图像保存地址
*@throwsIOException
*/
publicstaticvoidhandlImage(Filesfile,StringdestDir)throwsIOException{
FiledestF=newFile(destDir);
if(!destF.exists())
{
destF.mkdirs();
}

BufferedImagebufferedImage=ImageIO.read(sfile);
inth=bufferedImage.getHeight();
intw=bufferedImage.getWidth();

//灰度化
int[][]gray=newint[w][h];
for(intx=0;x<w;x++)
{
for(inty=0;y<h;y++)
{
intargb=bufferedImage.getRGB(x,y);
//图像加亮(调整亮度识别率非常高)
intr=(int)(((argb>>16)&0xFF)*1.1+30);
intg=(int)(((argb>>8)&0xFF)*1.1+30);
intb=(int)(((argb>>0)&0xFF)*1.1+30);
if(r>=255)
{
r=255;
}
if(g>=255)
{
g=255;
}
if(b>=255)
{
b=255;
}
gray[x][y]=(int)Math
.pow((Math.pow(r,2.2)*0.2973+Math.pow(g,2.2)
*0.6274+Math.pow(b,2.2)*0.0753),1/2.2);
}
}

//二值化
intthreshold=ostu(gray,w,h);
BufferedImagebinaryBufferedImage=newBufferedImage(w,h,BufferedImage.TYPE_BYTE_BINARY);
for(intx=0;x<w;x++)
{
for(inty=0;y<h;y++)
{
if(gray[x][y]>threshold)
{
gray[x][y]|=0x00FFFF;
}else
{
gray[x][y]&=0xFF0000;
}
binaryBufferedImage.setRGB(x,y,gray[x][y]);
}
}

//去除干扰线条
//for(inty=1;y<h-1;y++){
//for(intx=1;x<w-1;x++){
//booleanflag=false;
//if(isBlack(binaryBufferedImage.getRGB(x,y))){
////左右均为空时,去掉此点
//if(isWhite(binaryBufferedImage.getRGB(x-1,y))&&isWhite(binaryBufferedImage.getRGB(x+1,y))){
//flag=true;
//}
////上下均为空时,去掉此点
//if(isWhite(binaryBufferedImage.getRGB(x,y+1))&&isWhite(binaryBufferedImage.getRGB(x,y-1))){
//flag=true;
//}
////斜上下为空时,去掉此点
//if(isWhite(binaryBufferedImage.getRGB(x-1,y+1))&&isWhite(binaryBufferedImage.getRGB(x+1,y-1))){
//flag=true;
//}
//if(isWhite(binaryBufferedImage.getRGB(x+1,y+1))&&isWhite(binaryBufferedImage.getRGB(x-1,y-1))){
//flag=true;
//}
//if(flag){
//binaryBufferedImage.setRGB(x,y,-1);
//}
//}
//}
//}
ImageIO.write(binaryBufferedImage,"jpg",newFile(destDir,sfile
.getName()));

}

publicstaticbooleanisBlack(intcolorInt)
{
Colorcolor=newColor(colorInt);
if(color.getRed()+color.getGreen()+color.getBlue()<=300)
{
returntrue;
}
returnfalse;
}

publicstaticbooleanisWhite(intcolorInt)
{
Colorcolor=newColor(colorInt);
if(color.getRed()+color.getGreen()+color.getBlue()>300)
{
returntrue;
}
returnfalse;
}

publicstaticintisBlackOrWhite(intcolorInt)
{
if(getColorBright(colorInt)<30||getColorBright(colorInt)>730)
{
return1;
}
return0;
}

publicstaticintgetColorBright(intcolorInt)
{
Colorcolor=newColor(colorInt);
returncolor.getRed()+color.getGreen()+color.getBlue();
}

publicstaticintostu(int[][]gray,intw,inth)
{
int[]histData=newint[w*h];
//Calculatehistogram
for(intx=0;x<w;x++)
{
for(inty=0;y<h;y++)
{
intred=0xFF&gray[x][y];
histData[red]++;
}
}

//Totalnumberofpixels
inttotal=w*h;

floatsum=0;
for(intt=0;t<256;t++){
sum+=t*histData[t];}

floatsumB=0;
intwB=0;
intwF=0;

floatvarMax=0;
intthreshold=0;

for(intt=0;t<256;t++)
{
wB+=histData[t];//WeightBackground
if(wB==0){
continue;
}

wF=total-wB;//WeightForeground
if(wF==0){
break;
}

sumB+=(float)(t*histData[t]);

floatmB=sumB/wB;//MeanBackground
floatmF=(sum-sumB)/wF;//MeanForeground

//CalculateBetweenClassVariance
floatvarBetween=(float)wB*(float)wF*(mB-mF)*(mB-mF);

//Checkifnewmaximumfound
if(varBetween>varMax)
{
varMax=varBetween;
threshold=t;
}
}

returnthreshold;
}
}
4、准备识别的语言包
默认是英文(识别字母和数字),如果要识别中文(数字 + 中文),需要制定语言包。语言包可以指定一个路径,有就可以了。源码下载地址可以下载源码,然后到下面这个路径找到语言包,把语言包放到一个路径:例如:XXX/tessdata/下面。
tesseract.js-master.zip\tesseract.js-master\tests\assets\traineddata

5、对图片进行识别
/**
*图片识别
*@authorwangy
*@date2019-08-26
*@paramparameter
*/
publicstaticStringocrResult(WebElementelement)throwsException{

	FileSystemViewfsv=FileSystemView.getFileSystemView();
	Filecom=fsv.getHomeDirectory();//这便是读取桌面路径的方法了
	Stringurl="";
	Stringos=System.getProperty("os.name");
	//识别系统,找不同的语言包路径
	if(os.indexOf("Windows")==-1){
		url="/opt/google/";
	}else{
		url=com.getPath();
	}
	//获取元素截图的路径
Stringpath[]=Screenshot.elementscreenShot(element);
//获取未处理的截图路径
Stringimgpath=path[0];
	Stringresult=null;
	FileimageFile=newFile(imgpath);
	//要对图片处理
CleanElementImage.handlImage(imageFile,path[1]);
	ITesseractinstance=newTesseract();
	//读取语言包的路径地址
	instance.setDatapath(url+File.separator+"test"+File.separator
				+"tessdata");
	//默认是英文(识别字母和数字),如果要识别中文(数字+中文),需要制定语言包,这里是数字,所以没用语言包
//instance.setLanguage("chi_sim");
//为了防止没截完图片就识别,做了一个简单的循环
	try{
		StringocrResult=instance.doOCR(imageFile);
		if(imageFile.exists()&&ocrResult!=""){
			result=ocrResult;
		}else{
			while(true){
				Thread.sleep(1000);
				if(imageFile.exists()&&ocrResult!=""){
					result=ocrResult;
					break;
				}
			}
		}

	}catch(TesseractExceptione){
		System.out.println(e.getMessage());
	}
	returnresult;
}
这一部分由于项目问题,贴在这里做了特殊处理,原码有一点点区别。大家使用,如果有什么问题,欢迎反馈!
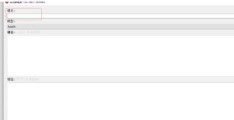
6、成果
这里简单放个对照,图片将就看一下效果,识别结果大概90%以上吧:

到此,关于“Java如何使用Tessdata做OCR图片文字识别”的学习就结束了,希望能够解决大家的疑惑。理论与实践的搭配能更好的帮助大家学习,快去试试吧!若想继续学习更多相关知识,请继续关注恰卡编程网网站,小编会继续努力为大家带来更多实用的文章!